Overview
Preparation
Connection
Configuration
Export an expense
Overview
Key features of the integration
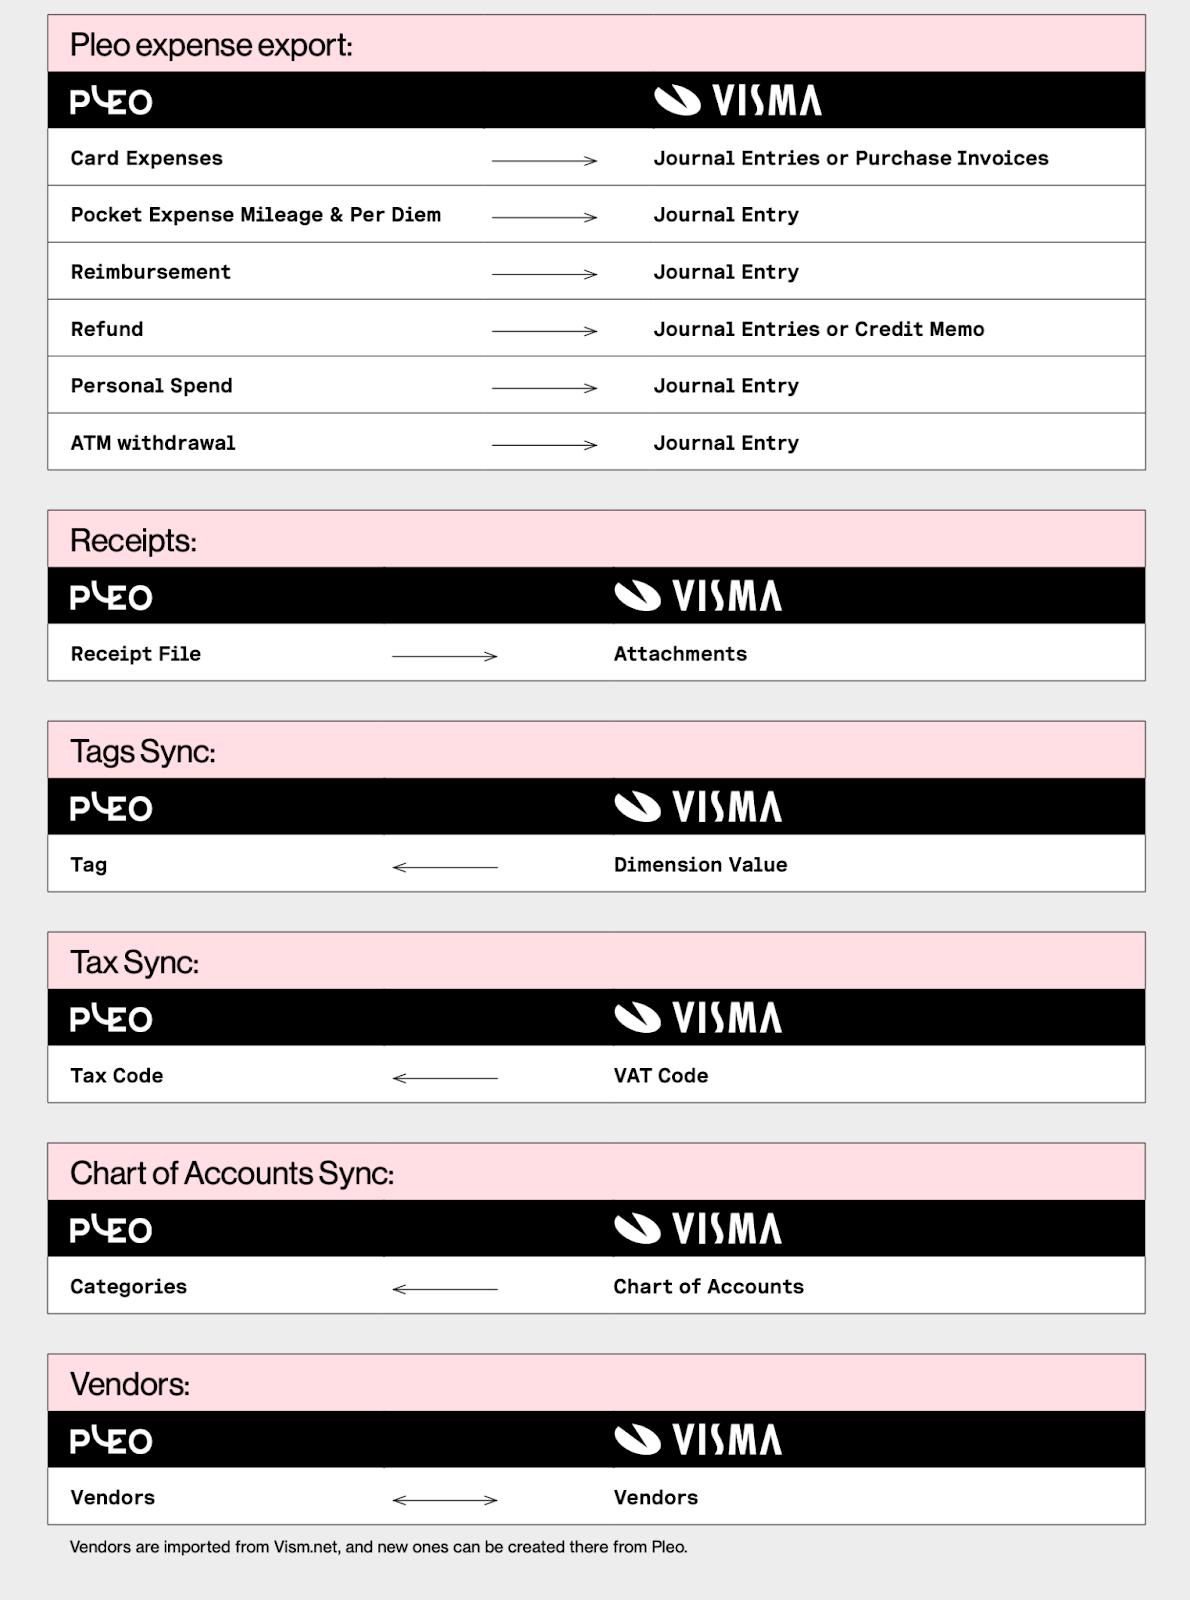
- Export expenses
- Pleo expenses can be exported into Visma Net as Journal entries and Purchase Invoices.
- All spend types are supported, except for Invoices.
- Expense attachments (receipts) are transferred together with the expense data.
- Tags Sync
- Users can import and sync Dimensions from their Visma Net with Tags in Pleo.
- Tax Sync
- VAT Codes from Visma Net are imported and synced as Tax Codes in Pleo.
- Chart of Accounts Sync
- Chart of Accounts from Visma Net is imported and synced with Pleo, so that users can easily link Accounts to Categories in Pleo.
- Vendor Sync & Bookkeeping
- Vendor records are imported and synchronised from Visma Net to Pleo.
- Users can create new Vendors in Visma Net from within Pleo.
- Exported Pleo expenses can be booked on actual Vendors in Visma Net.
Data sharing chart
Preparation
To install and set up the integration app, ensure you have:
- Admin or Bookkeeper role on Pleo
- Required user permissions on Visma.net:
- Visma App Store - Integration Administrator
- Visma Net - Financials Administrator and API user
How to check user permissions in Visma.net?
- Access Visma Home
- Click on the Admin symbol
- Select the user and the company
- Navigate to Service access
- Check Role and status


Create the following accounts in Visma.net
- Pleo Wallet - track expenses made with your Pleo cards.
- Pleo Out of pocket (optional) - track employee out of pocket, mileage per diem expense and reimbursements.
Note: Only required if you use Reimbursements in Pleo - Visma Net Default Vendor (optional) - generic Vendor account on which expenses exported as Purchase Invoices will be booked.
Note: Only required if you use Invoices in Pleo and/or export card expenses as Purchase Invoices in Visma.net
How to create Accounts in Visma.net?
- In Visma Net, navigate to Chart of Accounts
- Click on +
- Add the following:
- Account
- AccountClass (copy from another account)
- Description
- Use Default Sub
- Post Option
- Currency
- Save
How to create a Vendor in Visma.net?
- In Visma Net, navigate to Vendors
- Click on +
- Add the following:
- A Vendor Name
- Under General Info:
- Address
- Vendor Class
- Term
- Under Payment Settings:
- Payment Method (manual) or if you have one specific created to be used with Pleo Vendors.
- Cash Account (your Pleo Wallet account)
- Under Purchase Settings:
- Tax Zone
- CorporateID and/or Tax registration ID
- Click Save and close
Connection
- In Pleo, navigate to Settings
- Click Accounting
- Search for Visma.net
- Select the Visma.net integration and click Continue
- Click Connect
- Select the company you'd like to connect to
- Accept the connection
Configuration
Accounting configurations
- In Pleo, go to Settings
- Click Accounting
- Select Setup
- Map the accounts created in the previous step
Export configurations
- Transfer Attachment to Visma Net:
- Enable, if you want to transfer the receipts and other expense attachments to Visma Net.
- One Journal Transaction Per Export:
- Enable, if you want to get all exported expenses into a single journal entry instead of multiple journal entries.
- If disabled, every expense will be booked into a separate dedicated journal entry.
- Card expenses as Purchase Invoices:
- Enable, if you want, Expenses to be created as purchase invoices instead of journal entries.
- Auto Release Purchase Invoices:
- Only relevant if you have turned Card expenses as Purchase Invoices ON.
- Enable, if you want purchase invoices to be auto-released by the integration.
- Purchase Invoices Payment Method:
- Only relevant if you have turned on Card expenses as Purchase Invoices.
- Represents the payment method to be used when the integration creates purchase invoices in Visma Net.
- It is important to set it so that the invoice does not get paid twice.
Tags configurations
In the dropdowns, select the Dimensions from Visma.net that you want to synchronise with Tags in Pleo.
After having mapped accounting, export and tags configurations, be sure to click Save settings to avoid losing your settings.

Categories
Learn how to create your categories, and once created, you can follow these steps:
- In Pleo, go to Settings
- Click Accounting
- Access Categories
- For every category:
- Select the account number
- Add a Defaults Tax Code from the dropdown
- Click SaveSettings
Vendor Tagging
Learn how to activate Vendor tagging in Pleo.
Export an expense
After setting up the integration, it's important to export an expense to see if the integration is configured correctly.
Was this article helpful?
That’s Great!
Thank you for your feedback
Sorry! We couldn't be helpful
Thank you for your feedback
Feedback sent
We appreciate your effort and will try to fix the article
Need more help? Contact us.
Login and click the ? in the bottom right corner to chat with us. Having issues logging in? Find out why you are unable to log in.
